
IPv6!
By far, IPv6 support is rapidly becoming the hottest thing in the mobile industry. With carriers world-wide, scrambling to add IPv6 capabilities to their network and app-vendors, being forced by Apple/Google to support it, having the capability to support and properly test applications and services using an IPv6 network becomes a crucial thing.
At Greenfield.Tech, we’ve been experimenting with IPv6 for over 3 years now, mostly working internally within the confines of our own local networks. However, to truly test IPv6 properly, you need to do in the wild and get a proper IPv6 connection to the Internet. Thankfully, there are ways of doing just that, even if your carrier doesn’t support IPv6 – and the best thing about it, it doesn’t cost a dime – yes, it’s FREE!
The basic tools
In order to build a proper IPv6 network and uplink, you will need the following toolbox:
- A TunnerBroker account – https://www.tunnelbroker.net/
TunnelBroker is a FREE service by Hurricane Electric, enabling you to build an IPv6 tunnel to their network. The tunnel can be used to route pure IPv6 packets from your local network to their backbone, and from their to the world. This is a simple and inexpensive way to experiment with IPv6 without making your ISP go nuts. - A MikroTik Capable Router – https://amzn.to/2Hp37fv
To facilitate an IPv6 tunnel (over IPv6), you will need a capable router. I used the MikroTik RB750Gr3 router, but you can get others as well. The nice thing about the MikroTik is that it is really simple to use and it’s also simple to maintain, and highly economical. If you are building a lab for testing purposes, this is by far the best tool for the job. For production grade, I would recommend the RB1100x4 model, as it is more powerful.
Getting it done
Step 1: Setup your TunnelBroker account
You will need to register with TunnelBroker, it’s free and simple. Once registered, you will need to register your routers “External IP” address as the “IPv4 Endpoint” for the tunnel. Pay attention that you have multiple “Tunnel Servers”, I suggest you perform a small latency test from your network, to figure out which will be the best for you.
Once your tunnel had been created, the a screen similar to the below will appear:
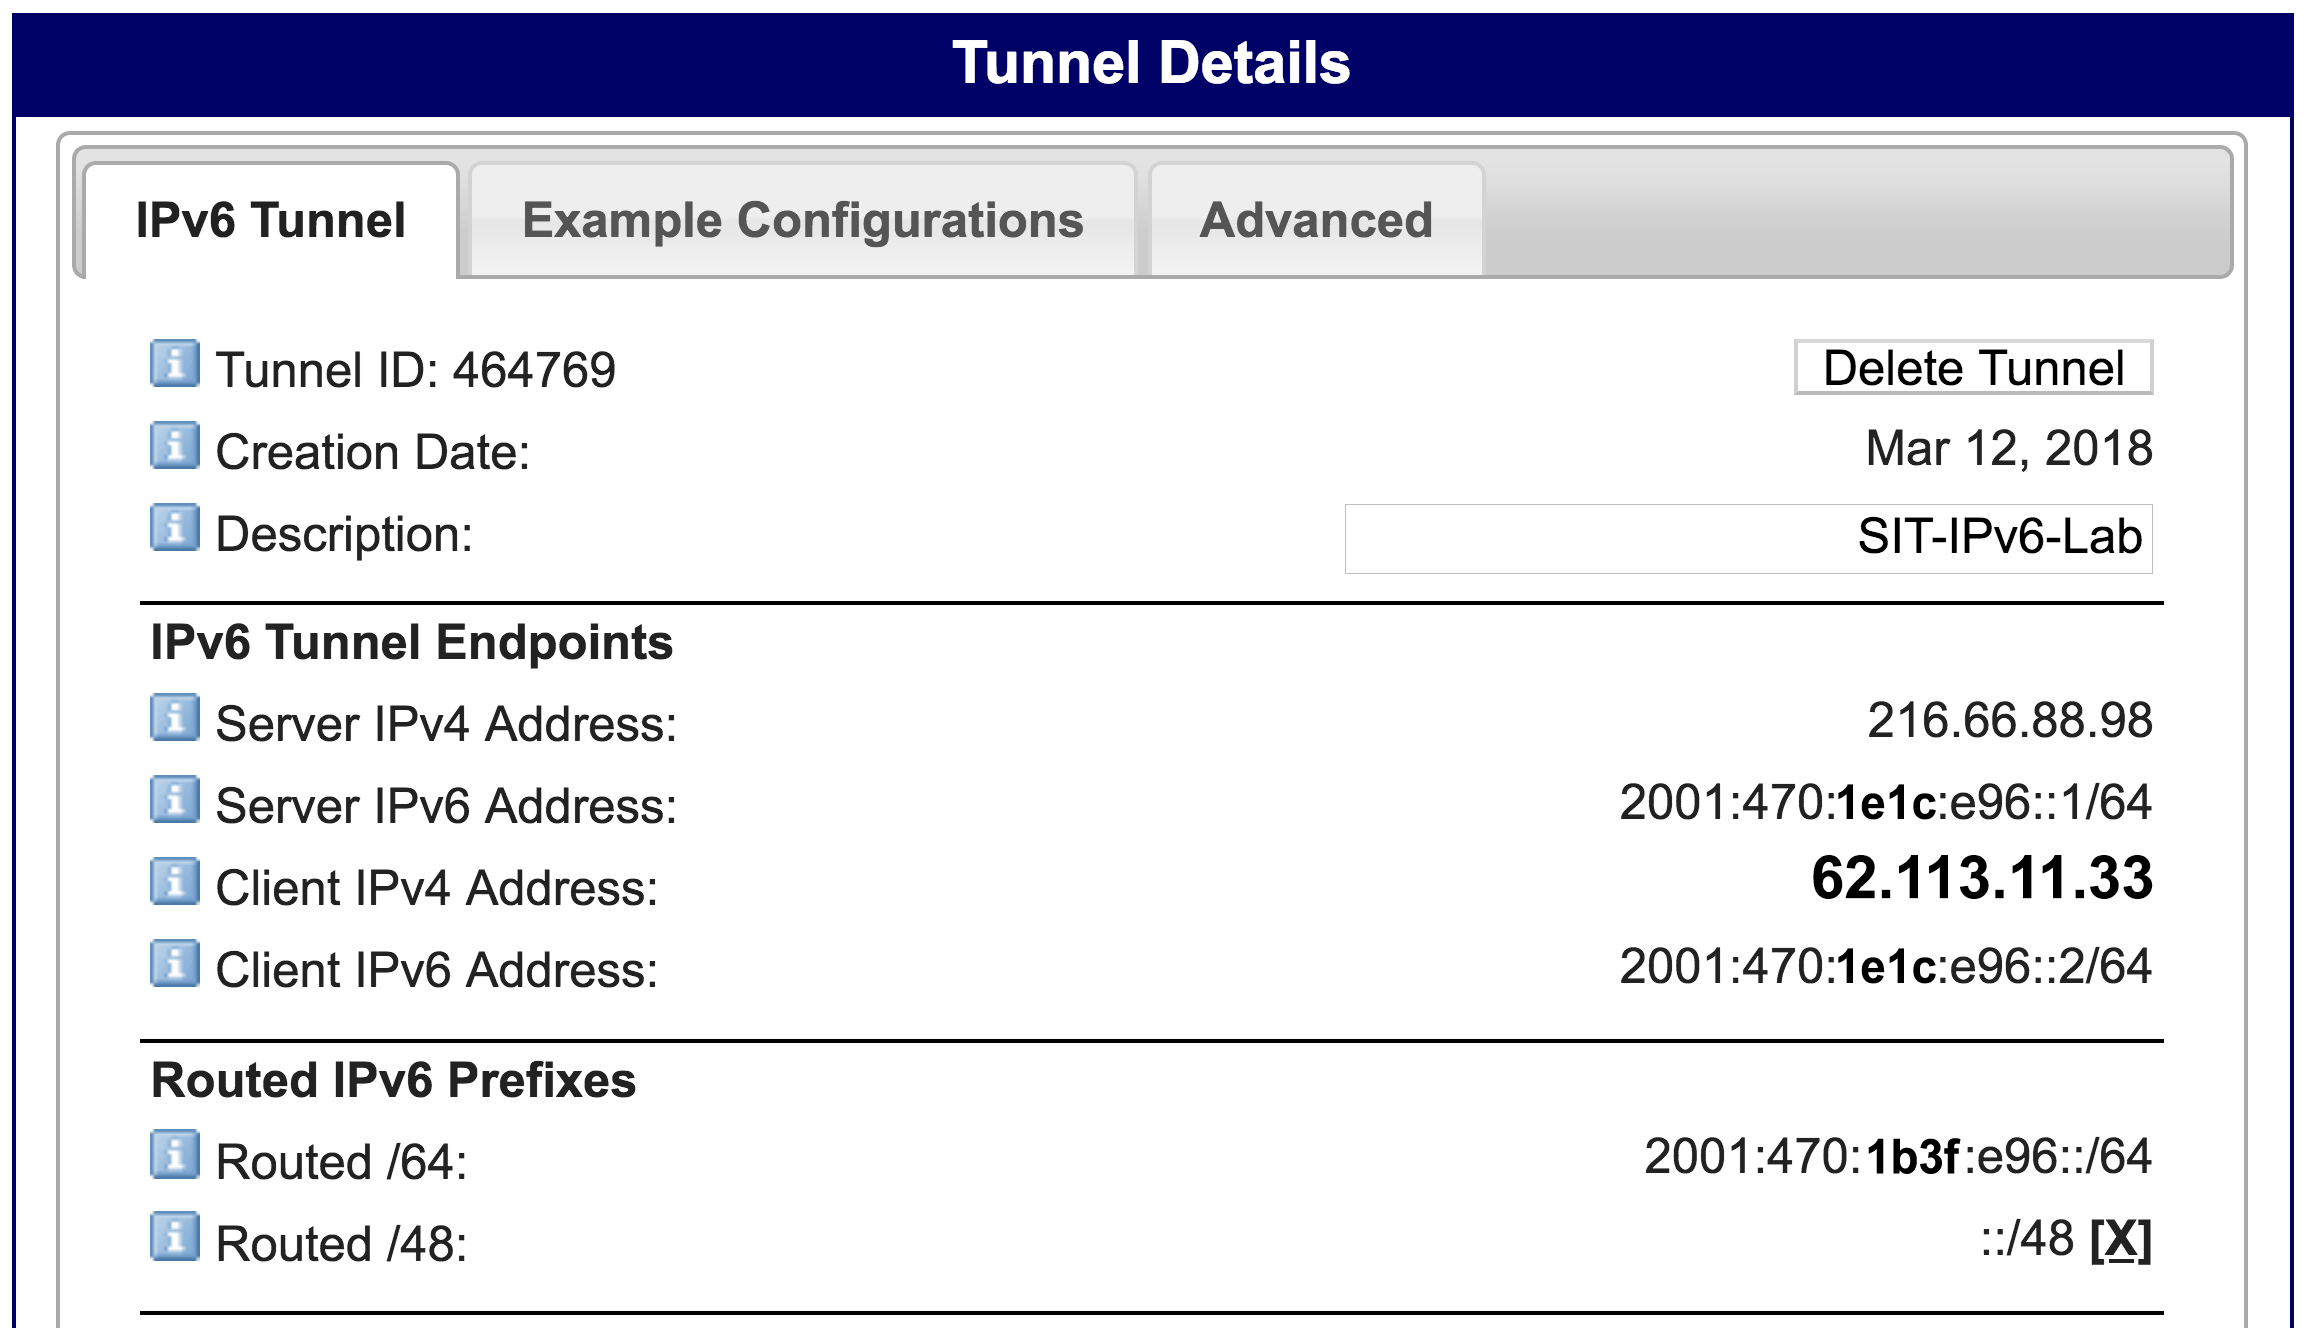
Pay close attention to the entries marked as “Server IPv4 Address”, “Server IPv6 Address”, “Client IPv6 Address” and “Routed /64”. These will be used in your configuration, and you must pay attention to these closely.
Step 2: Setup your 6to4 tunnel
To first setup your 6to4 tunnel, you must first make sure that you had installed and enabled your IPv6 extensions. Using the web-configurator of your MikroTik router, follow the following procedure:
- Upgrade your router to the latest version
From the main menu, open the “System” menu, then click on “Packages”. The installed packages page will come up. Now, click the “Check For Updates” button. If your installation requires, upgrade your installation to the latest version. Your router will reboot afterwards. - Enable the IPv6 Package
After finalising your upgrade (if at all), you need to enable the “ipv6” package. Once enabled, you may be required for a second reboot.
After you completed the above, open your console and configure your 6to4 tunnel using the following commands:
/interface 6to4 add comment="Hurricane Electric IPv6 Tunnel Broker" disabled=no \
local-address=62.113.11.33 mtu=1280 name=sit-tunnelbroker remote-address=216.66.88.98

/ipv6 route add comment="" disabled=no distance=1 dst-address=2000::/3 \
gateway=2001:470:1e1c:e96::1/64 scope=30 target-scope=10

/ipv6 address add address=2001:470:1e1c:e96::2/64 advertise=no disabled=no eui-64=no \
interface=sit-tunnelbroker
The above will get your tunnel working, your “Interfaces” should now contain an 6to4 interface that looks like this:
![]()
Step 3: Setup your local IPv6 network
Now, we will setup the local network configuration, without this one, we only have a tunnel – but routing won’t be possible at all without this one.
/ipv6 address add address=2001:470:1b3f:e96::1 interface=bridge-local advertise=yes
/ipv6 nd set [ find default=yes ] advertise-dns=yes
/ip dns set allow-remote-requests=yes servers=2001:4860:4860::8888,2001:4860:4860::4444
The above will set a local IPv6 address on your bridge-local interface, as part of your allocated IPv6 network by TunnelBroker. Pay attention that we use the “Routed /64” network as our prefix, with an added “1” at the end, indicating that this is the first IP address in that range.
The last row in the command set defines the Google IPv6 DNS servers as your router’s IPv6 DNS servers. If you have additional ones, you are welcome to add these in.
Step 4: Enable IPv6 DHCP services
Now, this is the part that normally doesn’t appear anywhere – how to enable IPv6 DHCP services. Sounds really simple, right? actually it’s not. The reason is simple, if you didn’t do step 3 properly, this will not work.
/ipv6 pool add name=myPool prefix=2001:470:1b3f:e96::/64 prefix-length=68
/ipv6 dhcp-server add name=myServer address-pool=myPool interface=bridge-local
Pay attention to the following: myPool is defined as a prefix of 68 over a network of 64. That means that our clients will receive addresses from a /68 pool, not a /64.
That’s it, the only thing you need to do now is renew your IP address on your machine. If you have IPv6 capabilities, you should now get and IP address from the 2001:470:1b3f:e96::/68 range. To test, you can use a simple PING command. On Mac I’ve used the ping6 command:
[nirs:~] 1 $ ping6 www.google.com
PING6(56=40+8+8 bytes) 2001:470:1b3f:e96:64f9:dcfa:760:7e6 --> 2a00:1450:4009:800::2004
16 bytes from 2a00:1450:4009:800::2004, icmp_seq=0 hlim=57 time=83.269 ms
16 bytes from 2a00:1450:4009:800::2004, icmp_seq=1 hlim=57 time=151.730 ms
16 bytes from 2a00:1450:4009:800::2004, icmp_seq=2 hlim=57 time=82.433 ms
16 bytes from 2a00:1450:4009:800::2004, icmp_seq=3 hlim=57 time=102.944 ms
16 bytes from 2a00:1450:4009:800::2004, icmp_seq=4 hlim=57 time=82.488 ms
16 bytes from 2a00:1450:4009:800::2004, icmp_seq=5 hlim=57 time=82.525 ms
16 bytes from 2a00:1450:4009:800::2004, icmp_seq=6 hlim=57 time=82.838 ms
^C
--- www.google.com ping6 statistics ---
7 packets transmitted, 7 packets received, 0.0% packet loss
round-trip min/avg/max/std-dev = 82.433/95.461/151.730/24.011 ms
[nirs:~] 6s $
The bullet script!
If you are lazy and just want my script in full, here it is:
/interface 6to4 add comment="Hurricane Electric IPv6 Tunnel Broker" disabled=no \
local-address=62.113.11.33 mtu=1280 name=sit-tunnelbroker remote-address=216.66.88.98
/ipv6 route add comment="" disabled=no distance=1 dst-address=2000::/3 \
gateway=2001:470:1e1c:e96::1/64 scope=30 target-scope=10
/ipv6 address add address=2001:470:1e1c:e96::2/64 advertise=no disabled=no eui-64=no \
interface=sit-tunnelbroker
/ipv6 address add address=2001:470:1b3f:e96::1 interface=bridge-local advertise=yes
/ipv6 nd set [ find default=yes ] advertise-dns=yes
/ip dns set allow-remote-requests=yes servers=2001:4860:4860::8888,2001:4860:4860::4444
/ipv6 pool add name=myPool prefix=2001:470:1b3f:e96::/64 prefix-length=68
/ipv6 dhcp-server add name=myServer address-pool=myPool interface=bridge-local
Just make sure you update the above script according to your network configuration.
The true challenge
Beyond getting it to work correctly, the biggest challenge is to get it properly working in your system – and worst, getting your various developments to transition from one network to another without disrupting services. While most web applications will work without a hitch, RTC applications (VoIP, WebRTC, Video) may suffer from various issues, as IP addresses change. This is one of the biggest challenges the cloudonix.io mobile SDK had to handle, and we had invested almost 6 months in understanding how to transition between the various networks. It’s not fully perfected, it still has some distance to go, but with the ability to transition between an IPv4 Mobile network to a Wi-Fi IPv6 network, without dropping the actual SIP session and media session, that took some undertaking to do.
If you would like to learn more about our cloudonix.io product, just click here.
Recent Comments